Restore damaged or broken clips on your crowd control barrier to full working order with our easy-to-install belt ends.
Belt End Replacement Assembly Instructions
BEFORE YOU START: Examine your new plastic Belt End carefully. It will arrive disassembled in two pieces.
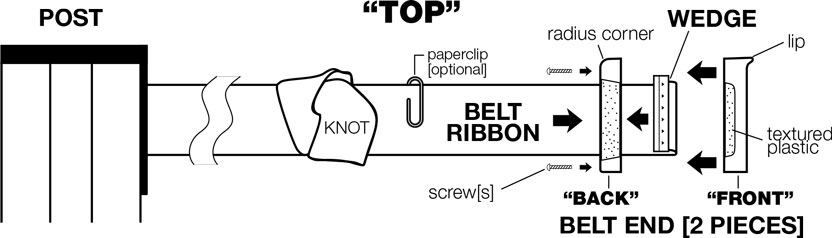
Belt End "BACK": Has textured plastic that wraps around the back and a radius corner which should be oriented to "TOP".
Belt End "FRONT": Has the dovetail shape that fits the Beltrac post groove with a lip on one end that should be oriented to "TOP".
IMPORTANT: The top edge of the Belt Ribbon and the top of the Belt End must be oriented "top-to-top" throughout assembly or the newly assembled Belt End will not work properly.
Suggestion: mark the "top" edge of the Belt Ribbon with a paperclip before knotting to ensure correct assembly.
1. Pull enough Belt Ribbon out from post to make a
loose knot. This will keep it from irretrievably retracting and will make it easier to work with. Take note of the top edge of the Belt Ribbon [suggestion: paperclip]. Cut the old plastic Belt End off with scissors, taking care not to unravel the Belt Ribbon.
2. Thread the Belt Ribbon through the slot in the Belt End "BACK" from the side with the countersink holes. Double-check that the radius corner and the Belt Ribbon are oriented to "TOP".
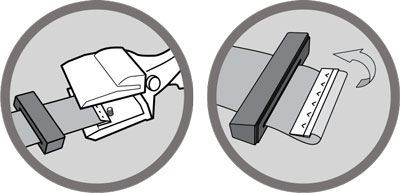
3. Position Wedge in Crimping Tool: position the fold of the Wedge against the screws. Gently apply pressure with Crimping Tool to hold in place. Do not clamp.
4. Feed the Belt Ribbon into the Wedge. Make sure it is centered and fully seated to the back of the Wedge, then apply pressure with the Crimping Tool to securely clamp the Belt Ribbon into the Wedge.
5. Fold Ribbon/Wedge over and fit it snugly into the BACK piece of the plastic Belt End. Fit the FRONT piece of the plastic Belt End onto the BACK piece [there is only one way it will fit] and secure with screws. Untie knot and retract Belt.
You can use any standard pliers or this special Belt End Crimper Tool

 Skip to content